Table of contents
- Connection
- Setup in Quickorder
- Transfer of documents to the accounting system:
- Transfer of gift card sales and turnover with gift cards.
- Transfer of invoice information
Connection
Before you start the integration in Quickorder, you must find the Quickorder POS API key in Poweroffice GO and create an API key.
Select Menu -> Settings -> Extensions

Under extensions, select "Add extension" and search for Quickorder. Click OK
Copy client key by highlighting it and copy. The window is closed by pressing OK.
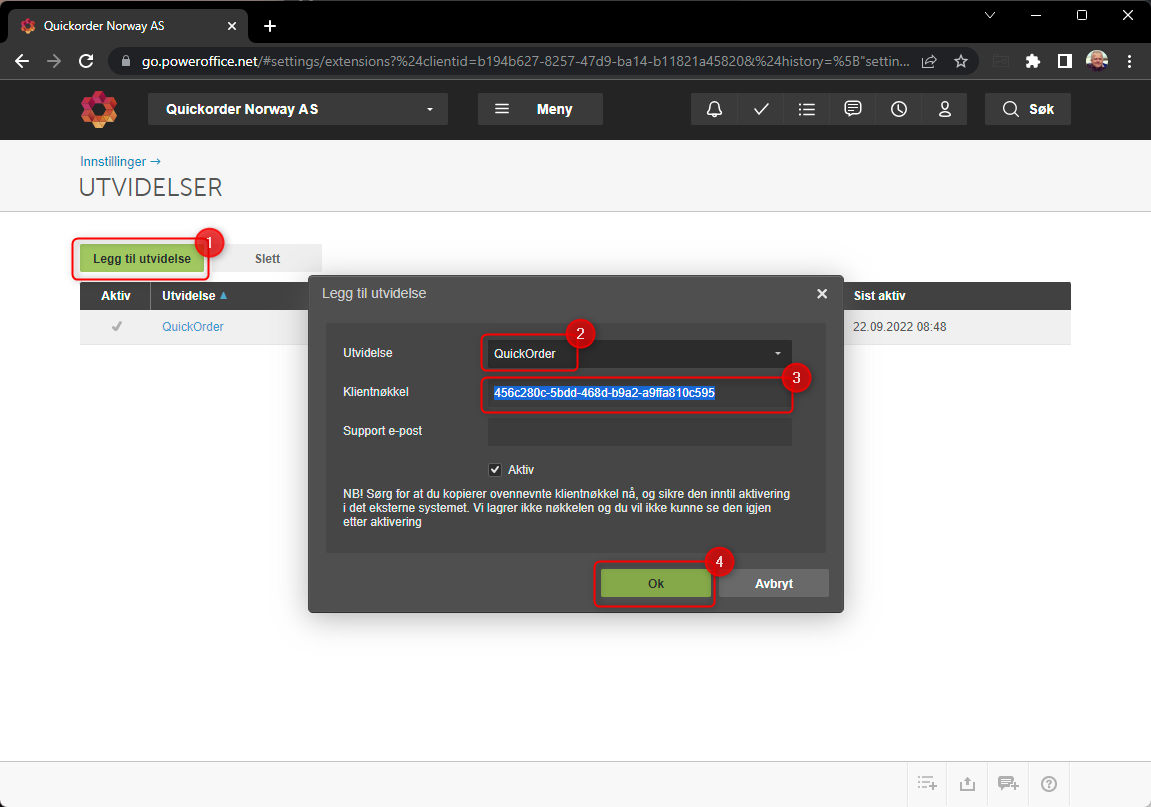
NOTE: EVERY POS VENUE NEEDS ITS OWN API KEY!
If multiple POS venues are using the same Poweroffice account (Same company but different department) then you will need to create additional klient keys. One for every department.
The way to create this is the same as the first key, but insted of choosing "Quickorder" you chose "Egendefinert" and put in an app key. 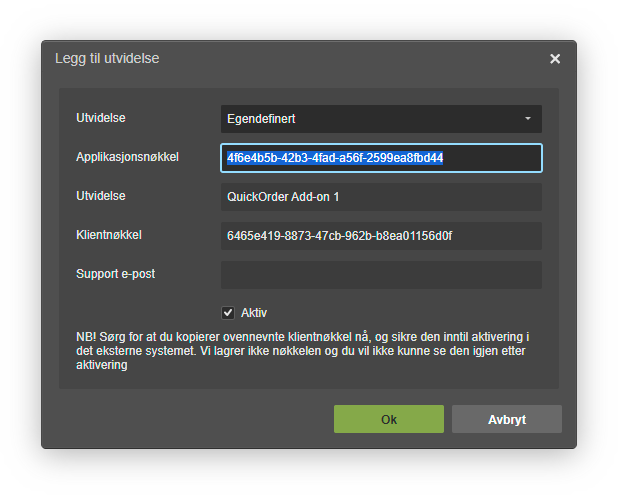
You can have up to ten department in the same company. First one being the main Quickorder. And the nine additional.
Here are the nine additional app keys:
- QuickOrder Add-on 1: 4f6e4b5b-42b3-4fad-a56f-2599ea8fbd44
- QuickOrder Add-on 2: da8860a2-dfe0-444d-905d-85762bcbc4db
- QuickOrder Add-on 3: dc1711af-ece3-42b4-a167-20760243a7d5
- QuickOrder Add-on 4: 97b982b7-10e1-4e85-b5dc-204df9f45484
- QuickOrder Add-on 5: 72b85765-8757-490c-b105-f2c06347fdab
- QuickOrder Add-on 6: 4e19601a-9ea7-4ca1-91b4-5158e792d8d8
- QuickOrder Add-on 7: "814c555c-bef6-430d-aadc-7ef83ca02444"
- QuickOrder Add-on 8: "cbdb5329-cdfe-4728-9d58-7113de86e743"
- QuickOrder Add-on 9: "fa02f52c-b813-47d1-94d7-ca5c8f774a78"
!You must write to Quickorder and tell which departments use which Add-on keys. It will only work when each department is also associated with the correct add-on with us.
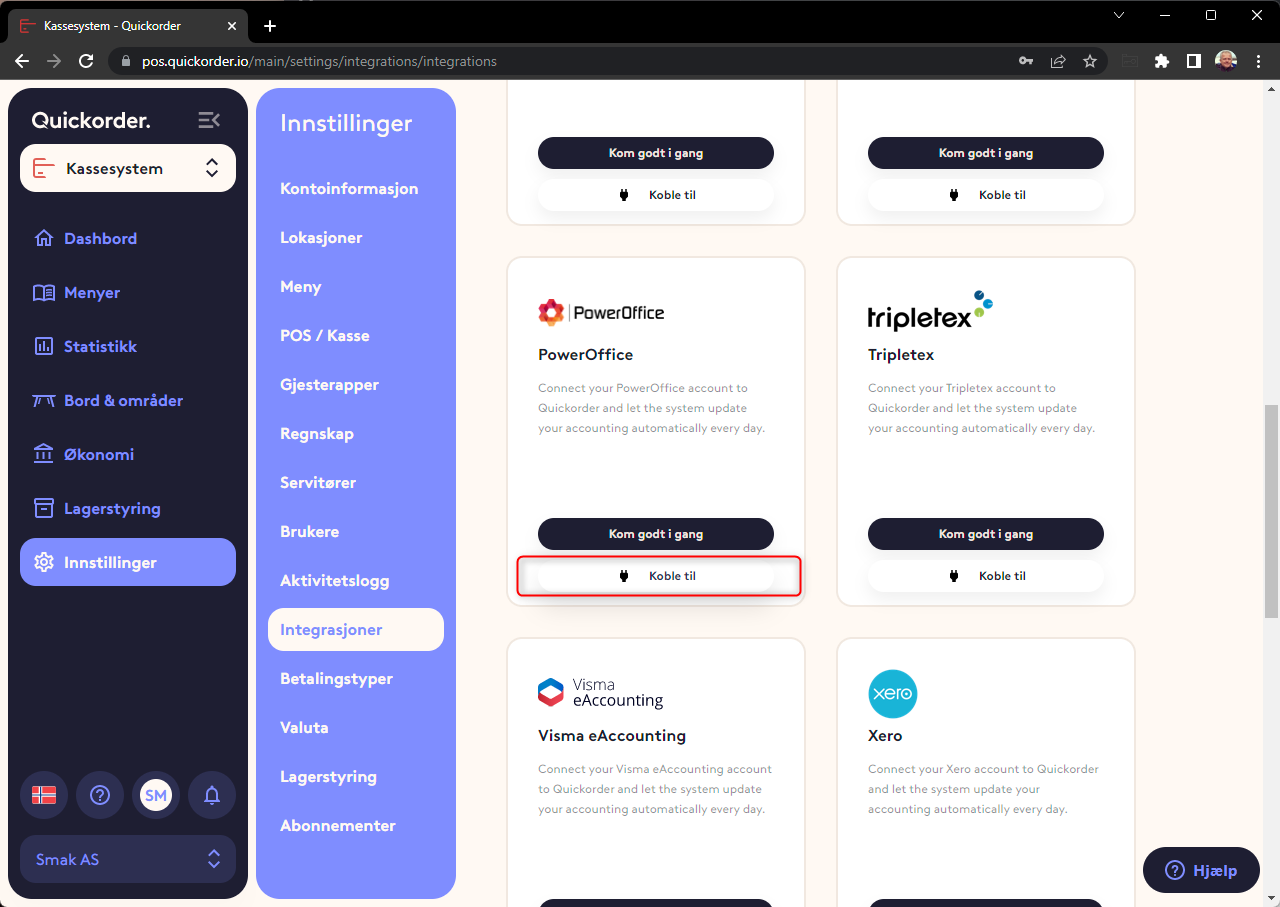
The next step is to connect Quickorder and Poweroffice GO together. This is done in the Quickorder back office under Settings -> Integrations.
It is important to wait with this next step untill you have been notified that Quickorder has update the keys on their side
Press "Connect"
Paste Token from Poweroffice GO
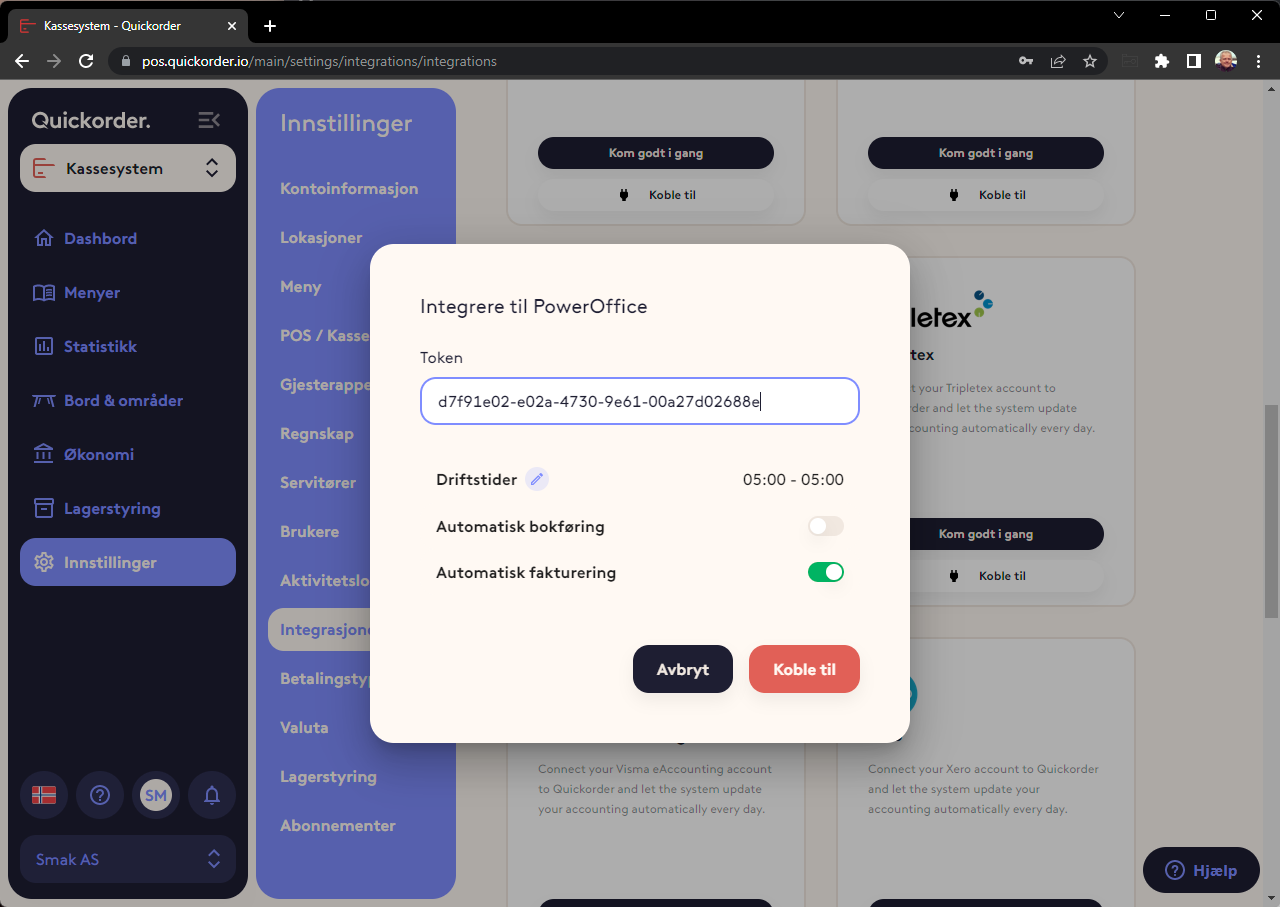
The 2 systems are then connected.
- Select department if this is something used in Power Office GO.
- Make sure the operating hours are 05:00 to 05:00 (doesn't hurt even if there is no turnover after 24:00)
- Wait to turn on automatic transfer until setup is completed and tested.
- Switch on automatic invoicing if you want Credit orders to be transferred as open orders to Poweroffice GO*
Setup in Quickorder
Now there are 3 places where the chart of accounts from Poweroffice GO must be linked under positions in Quickorder. It is:
- Menu -> Product types (Sales accounts are entered here. Typically the 3000 series)
- Accounting (Enter VAT codes here)
- Payment types (The account for the various payment types is entered here)
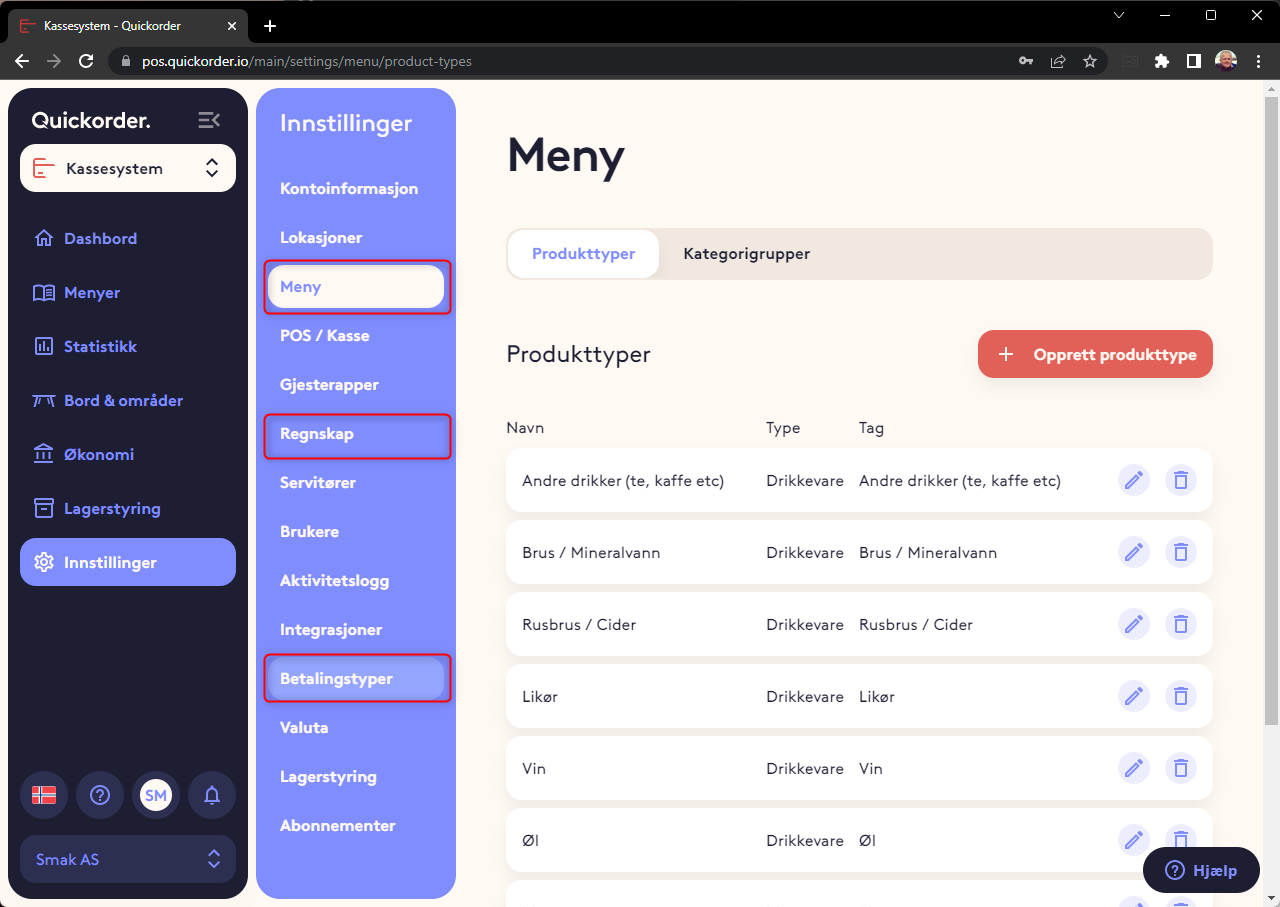
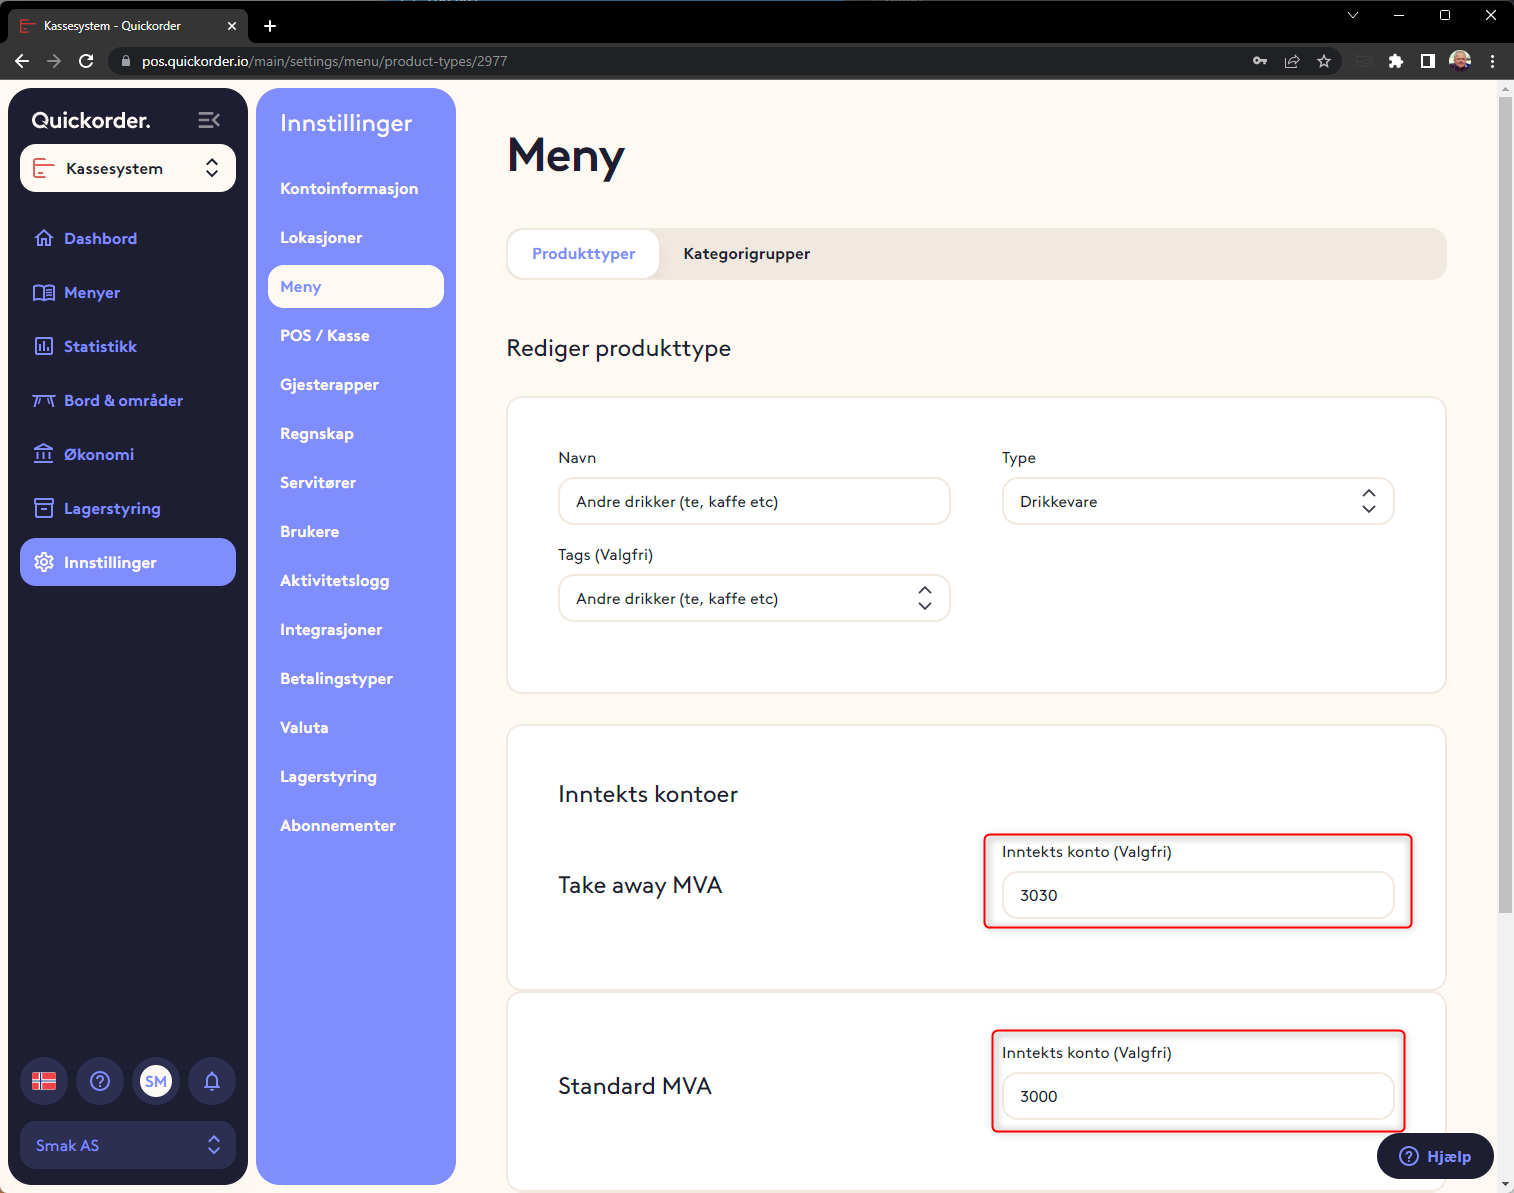
1. Menu card - Product types.
For each product type, based on the general ledger in Poweroffice GO, the correct account for the sale must be assigned. One for turnover with normal VAT and one for turnover with reduced (takeaway) VAT.
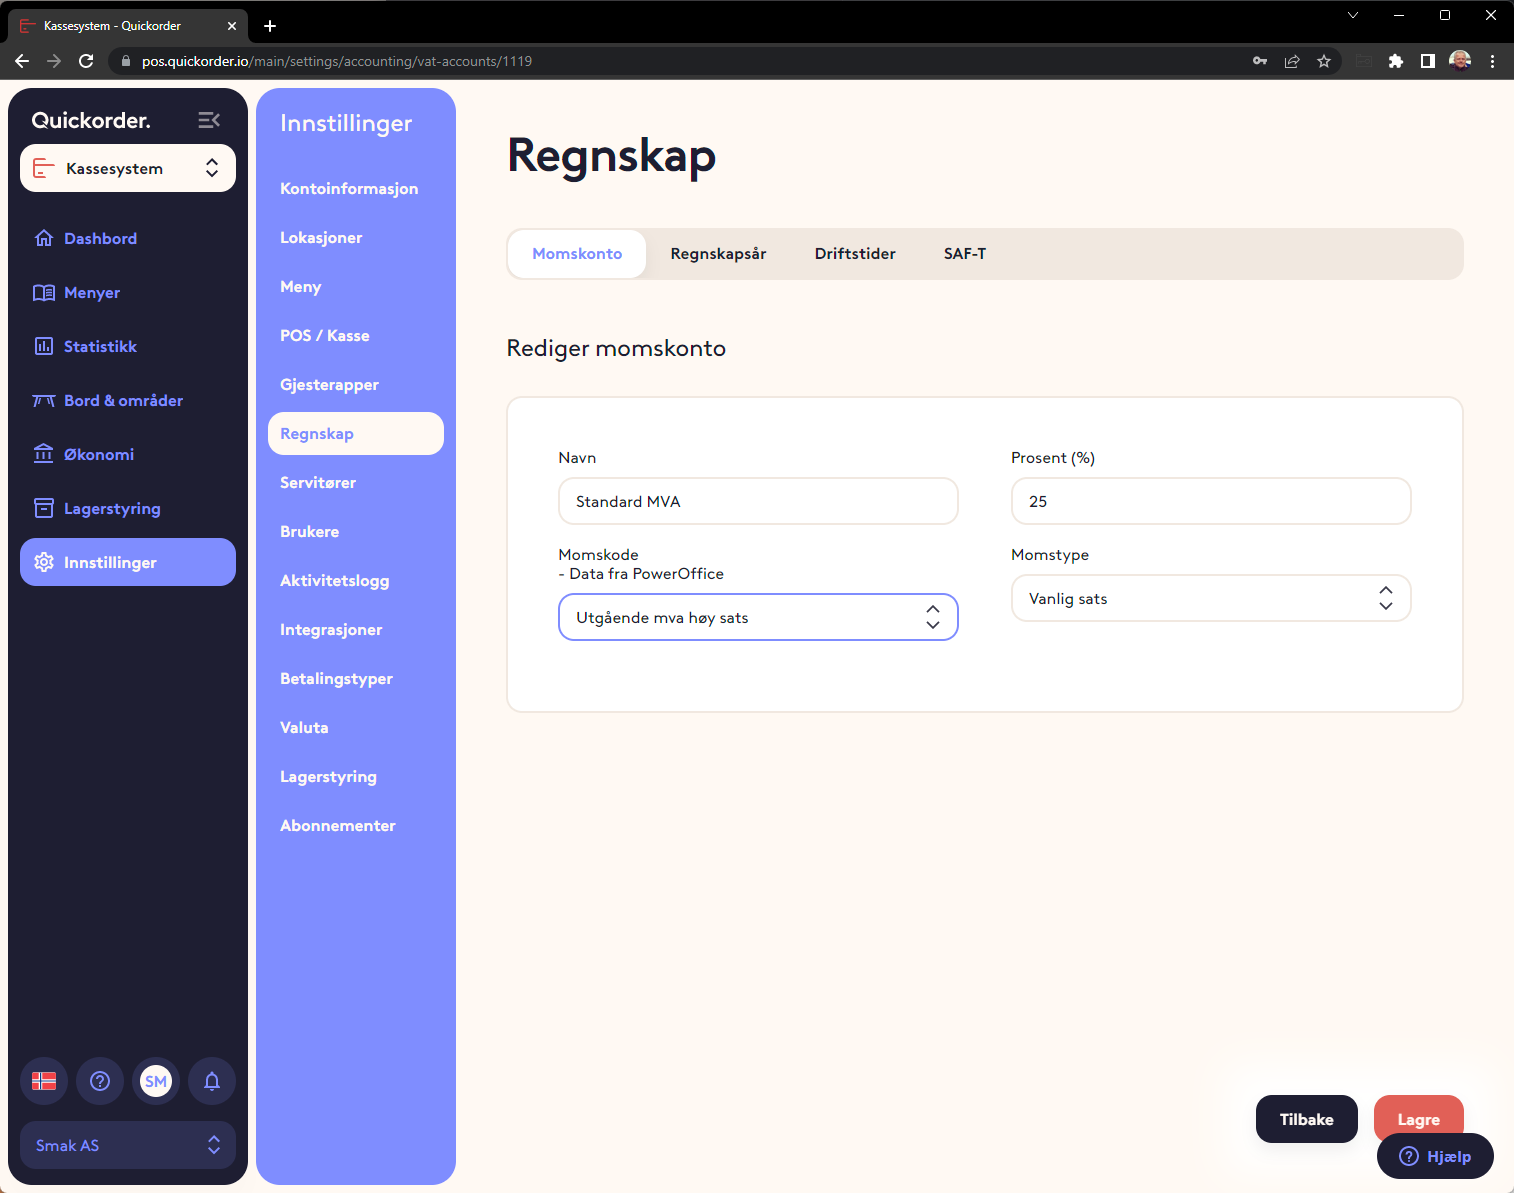
2. Bookkeeping - VAT codes
For each VAT account, the type of VAT must be specified in Poweroffice GO.
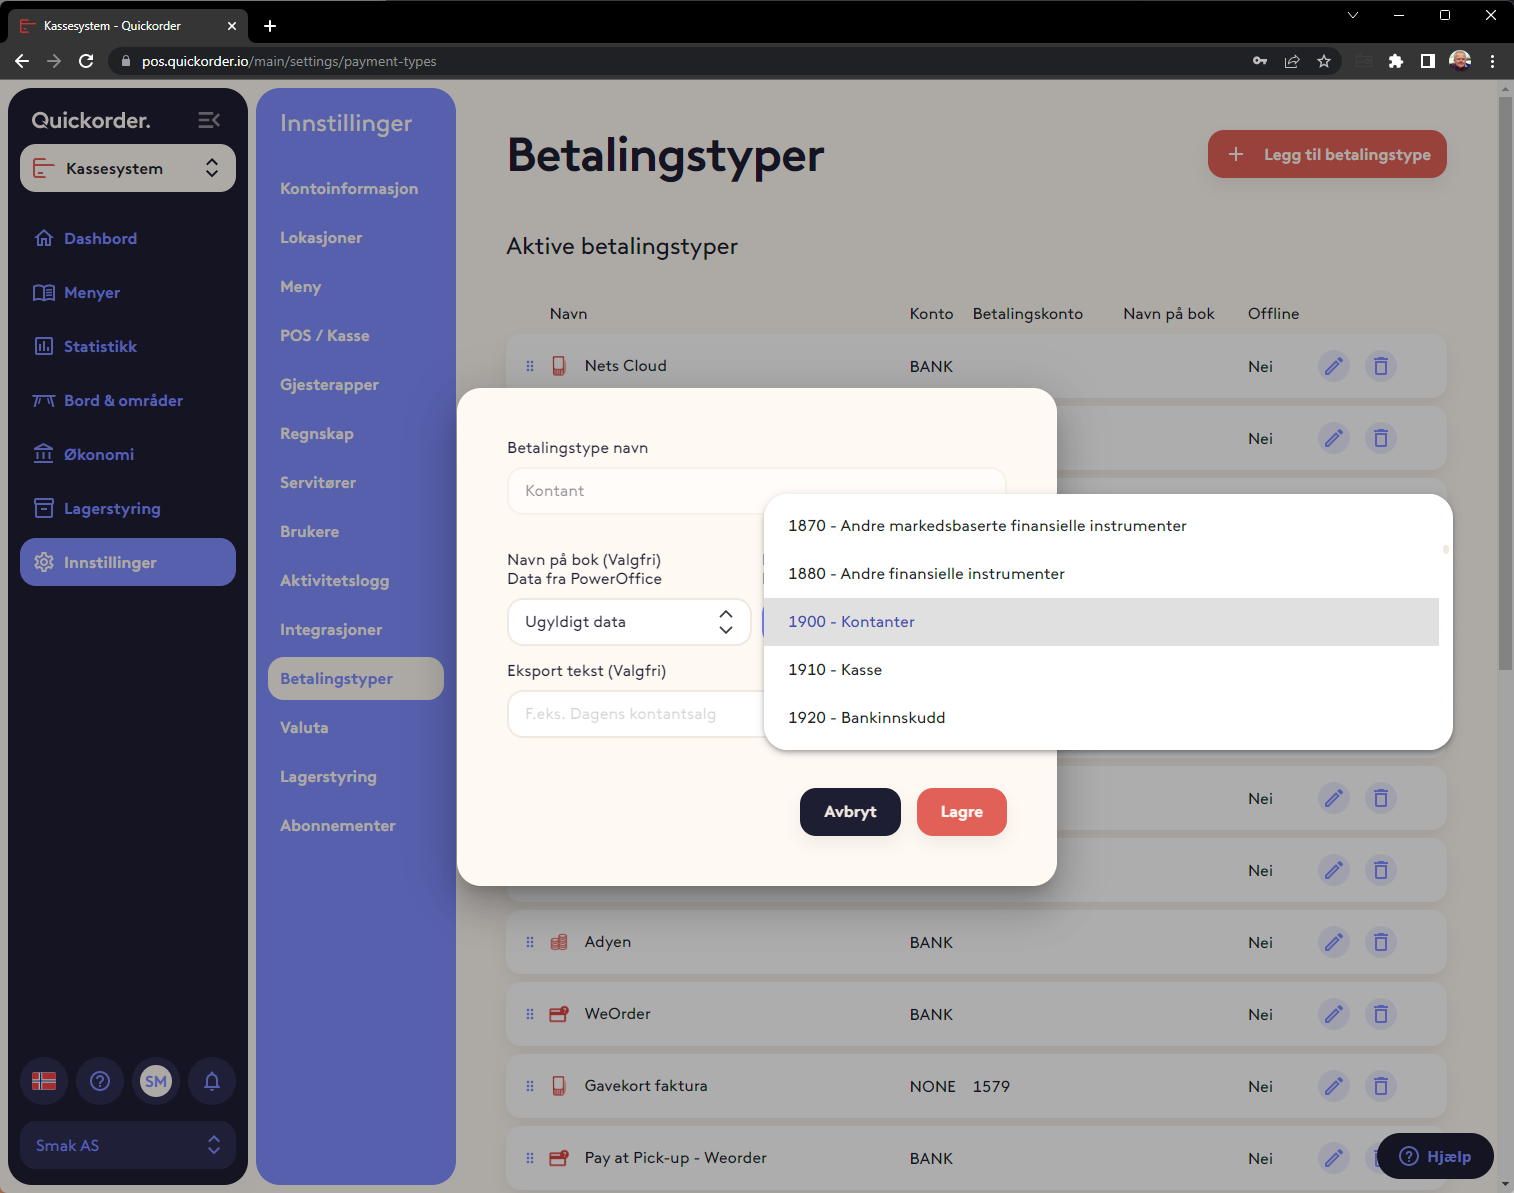
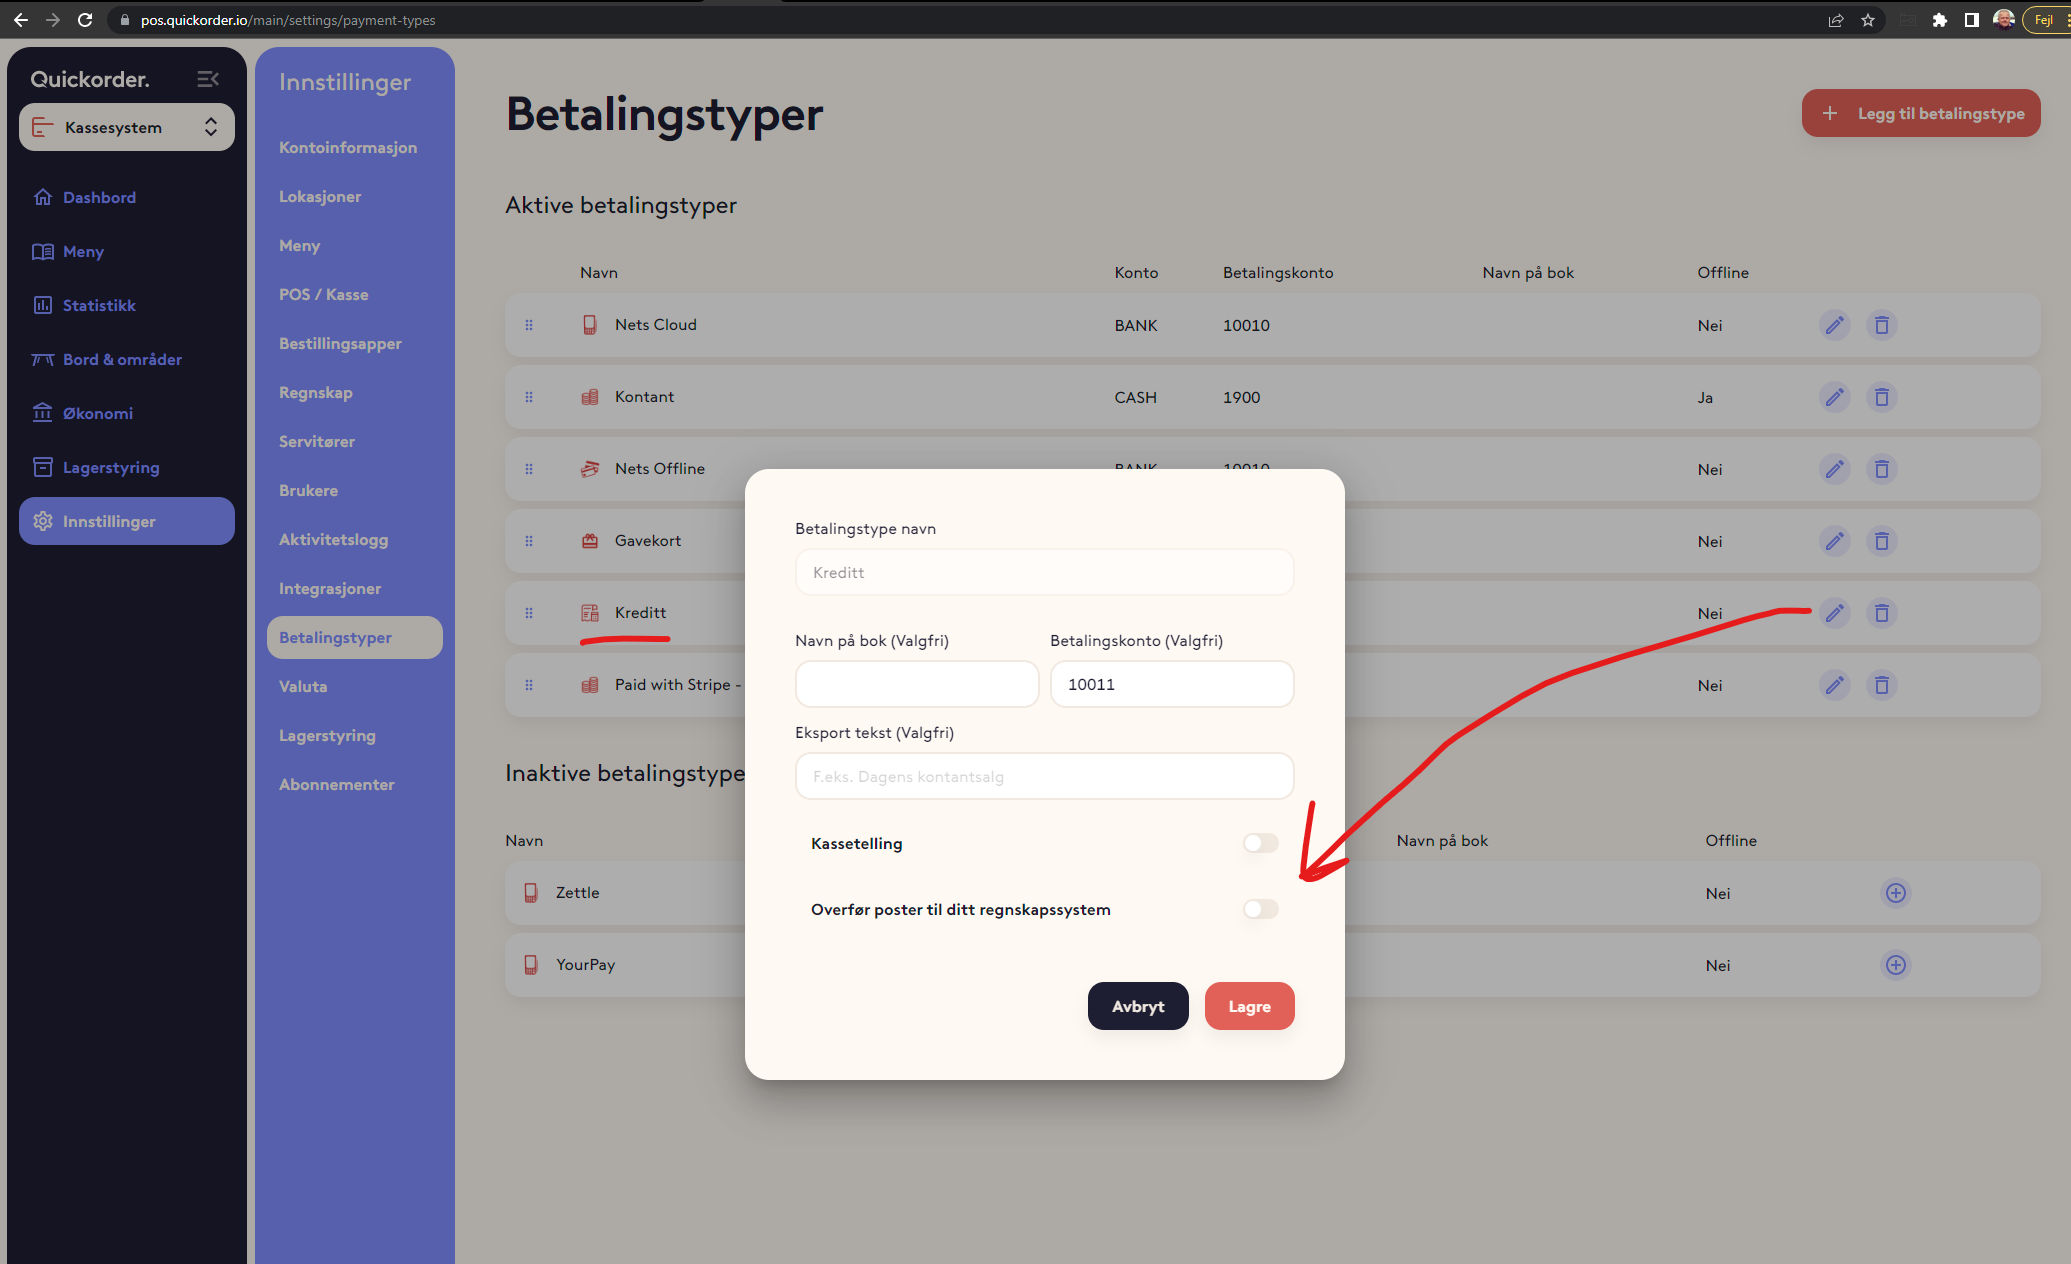
3. Payment types
An account must be entered for each payment type. Here it is important not to deposit an account for the bank directly. A payment at a card terminal must be made via an auxiliary account. Typical in the 15xx series. 1900 is usually cash.
When the 3 are set up, it is ready to transfer to Poweroffice GO.
Transfer of documents to the accounting system:
Select Finance -> Export and select a period.
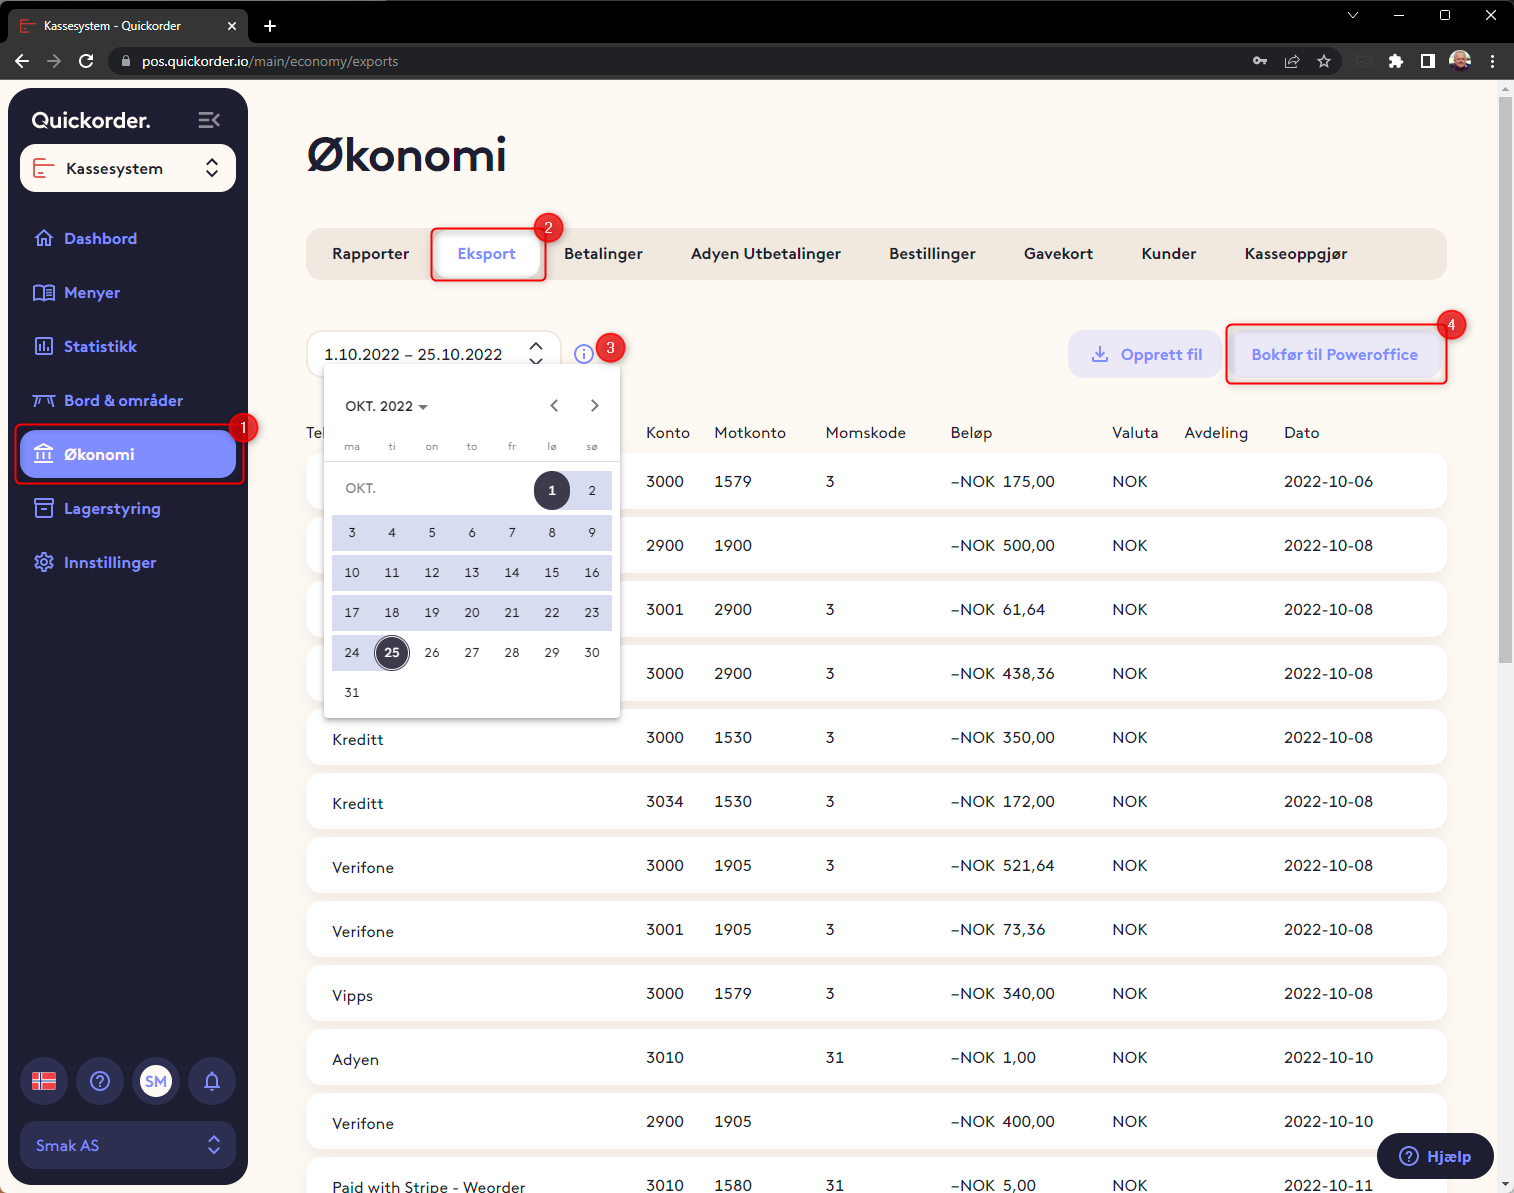
Now a display of vouchers will appear. Then press "Transfer to Poweroffice GO".
There can NOT be blank accounts as in the example above. Then there is something that needs to be set up. Make sure that the overview here has account and counter account throughout.
When it has been transferred up to date, it is recommended to activate automatic transfer. Press the 3 dots inside the integration under Settings -> Integrations. And turn on "Automatic export" on the integration.
What is transferred is all daily sales.
All movements at the cash register other than cash sales must be entered manually.
Transfer of gift card sales and turnover with gift cards.
In order for gift cards to be transferred, it is necessary to activate this
- Go to Settings -> Payment types
- Select the pencil on "Gift card" and make sure that transfer to accounting is switched on

Transfer of invoice information
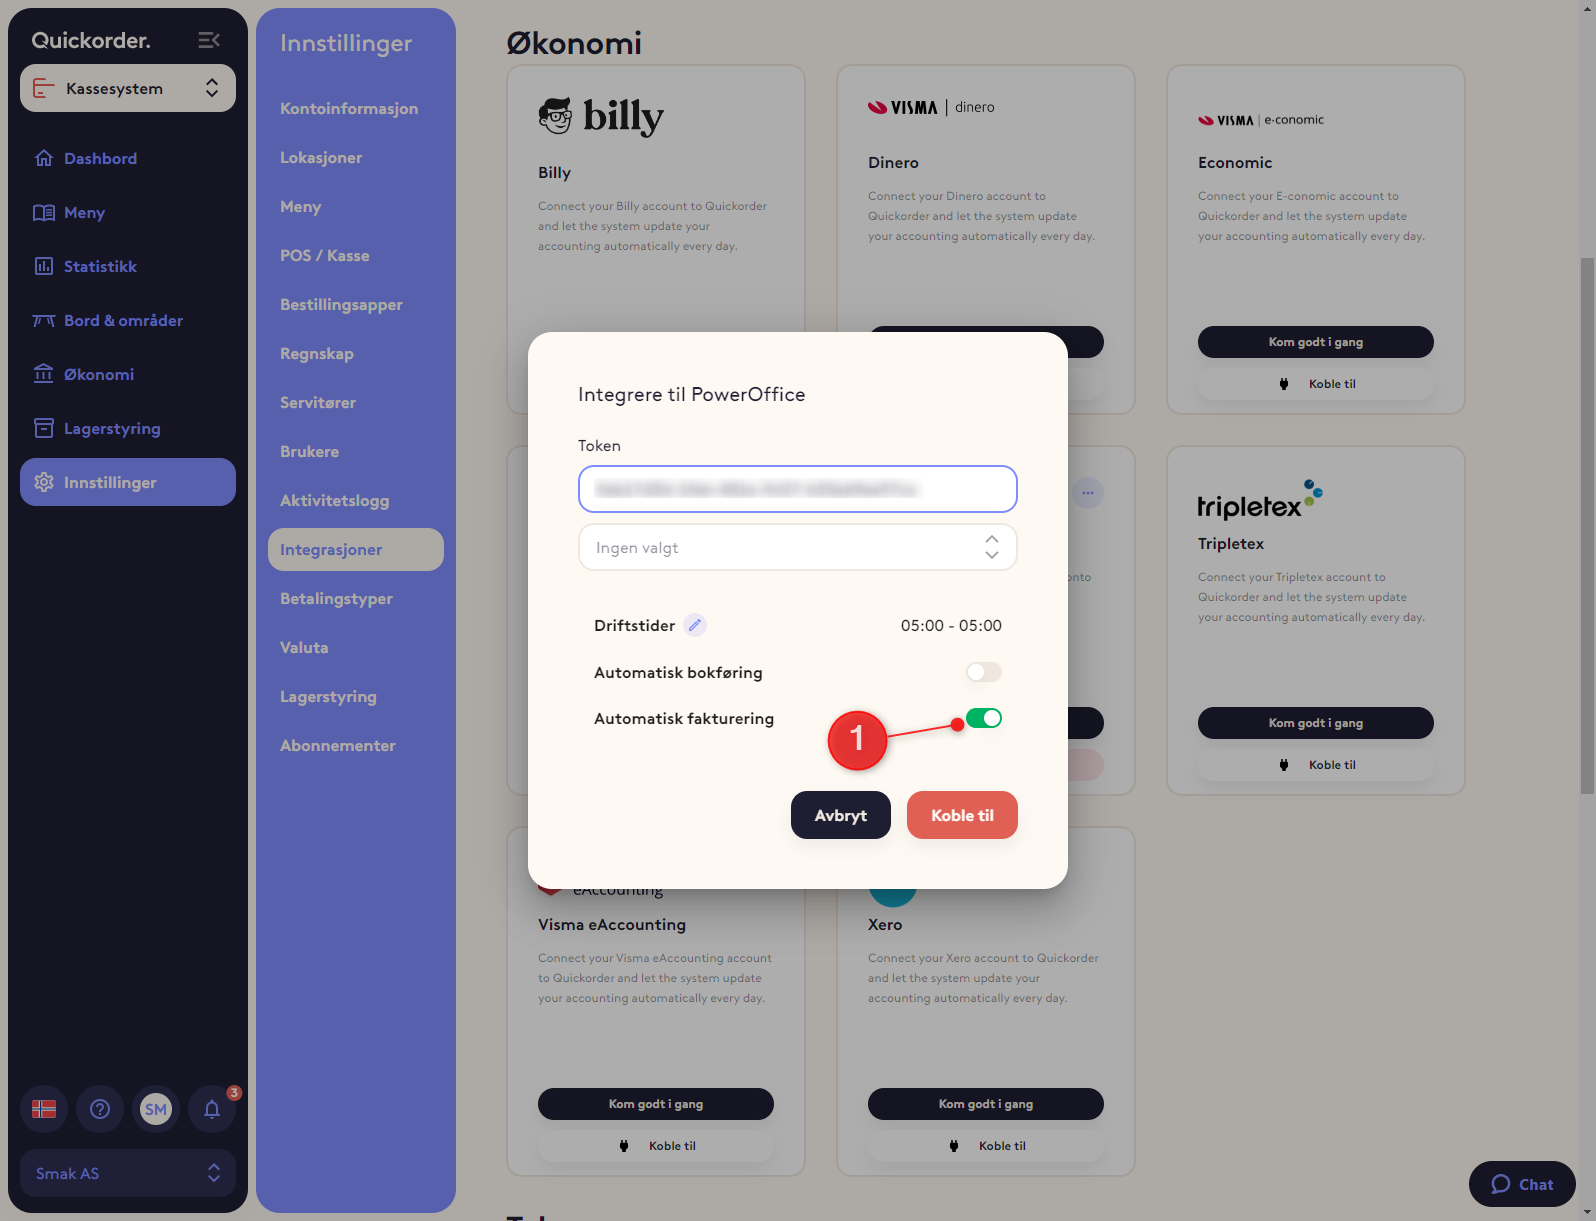
Enable automatic invoicing integration.
IMPORTANT! When orders are transferred to invoicing in Poweoffice GO, it is of course NOT appropriate to transfer financial items from credit orders. Make sure this is turned off.
- Go to Settings -> Payment types
- Select the pencil on "Credit" and make sure that transfer to accounts is switched off
- Go to Settings -> Integrations
- Go to the PowerOffice card and click the blue button at the top right to edit PowerOffice
- Turn ON 'Automatic Billing' (1)
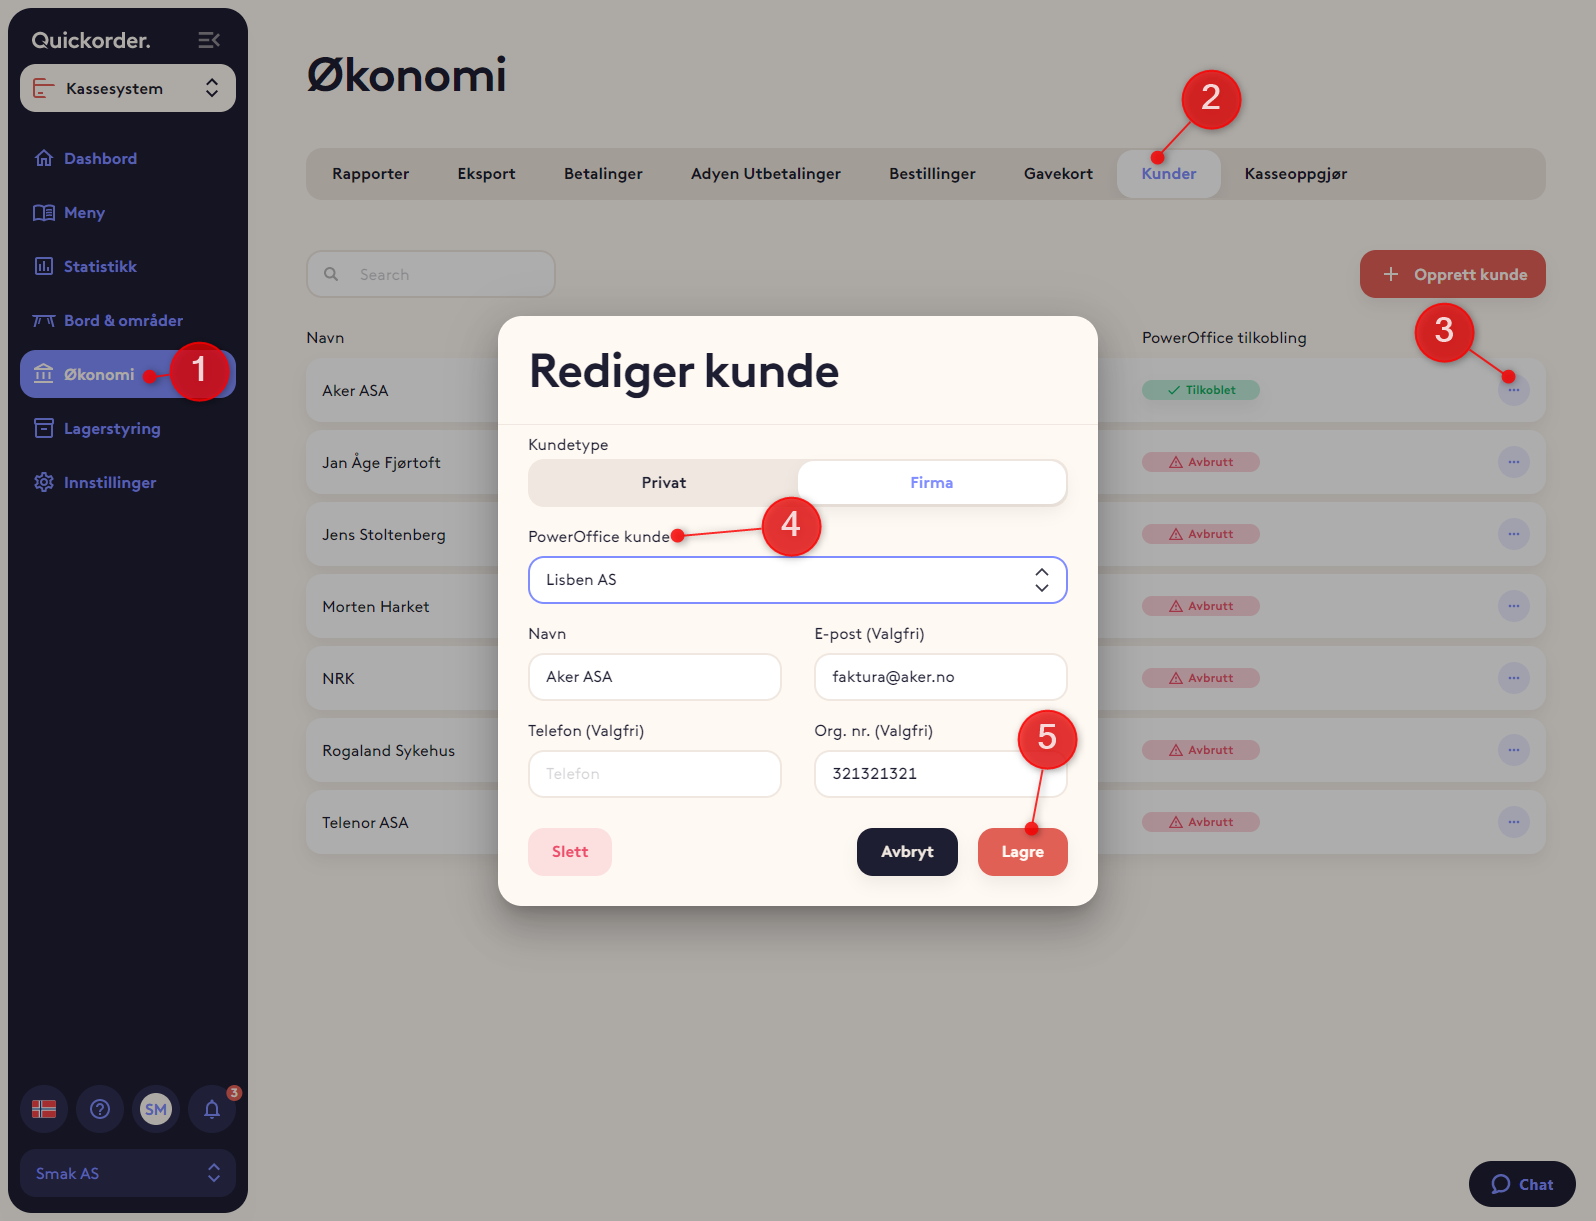
Connect customers to your customers in PowerOffice
- Go to Finance (1) -> Customers (2)
- Edit a customer (3)
- In the drop-down menu you will find the customer from PowerOffice (4)
- Save (5)
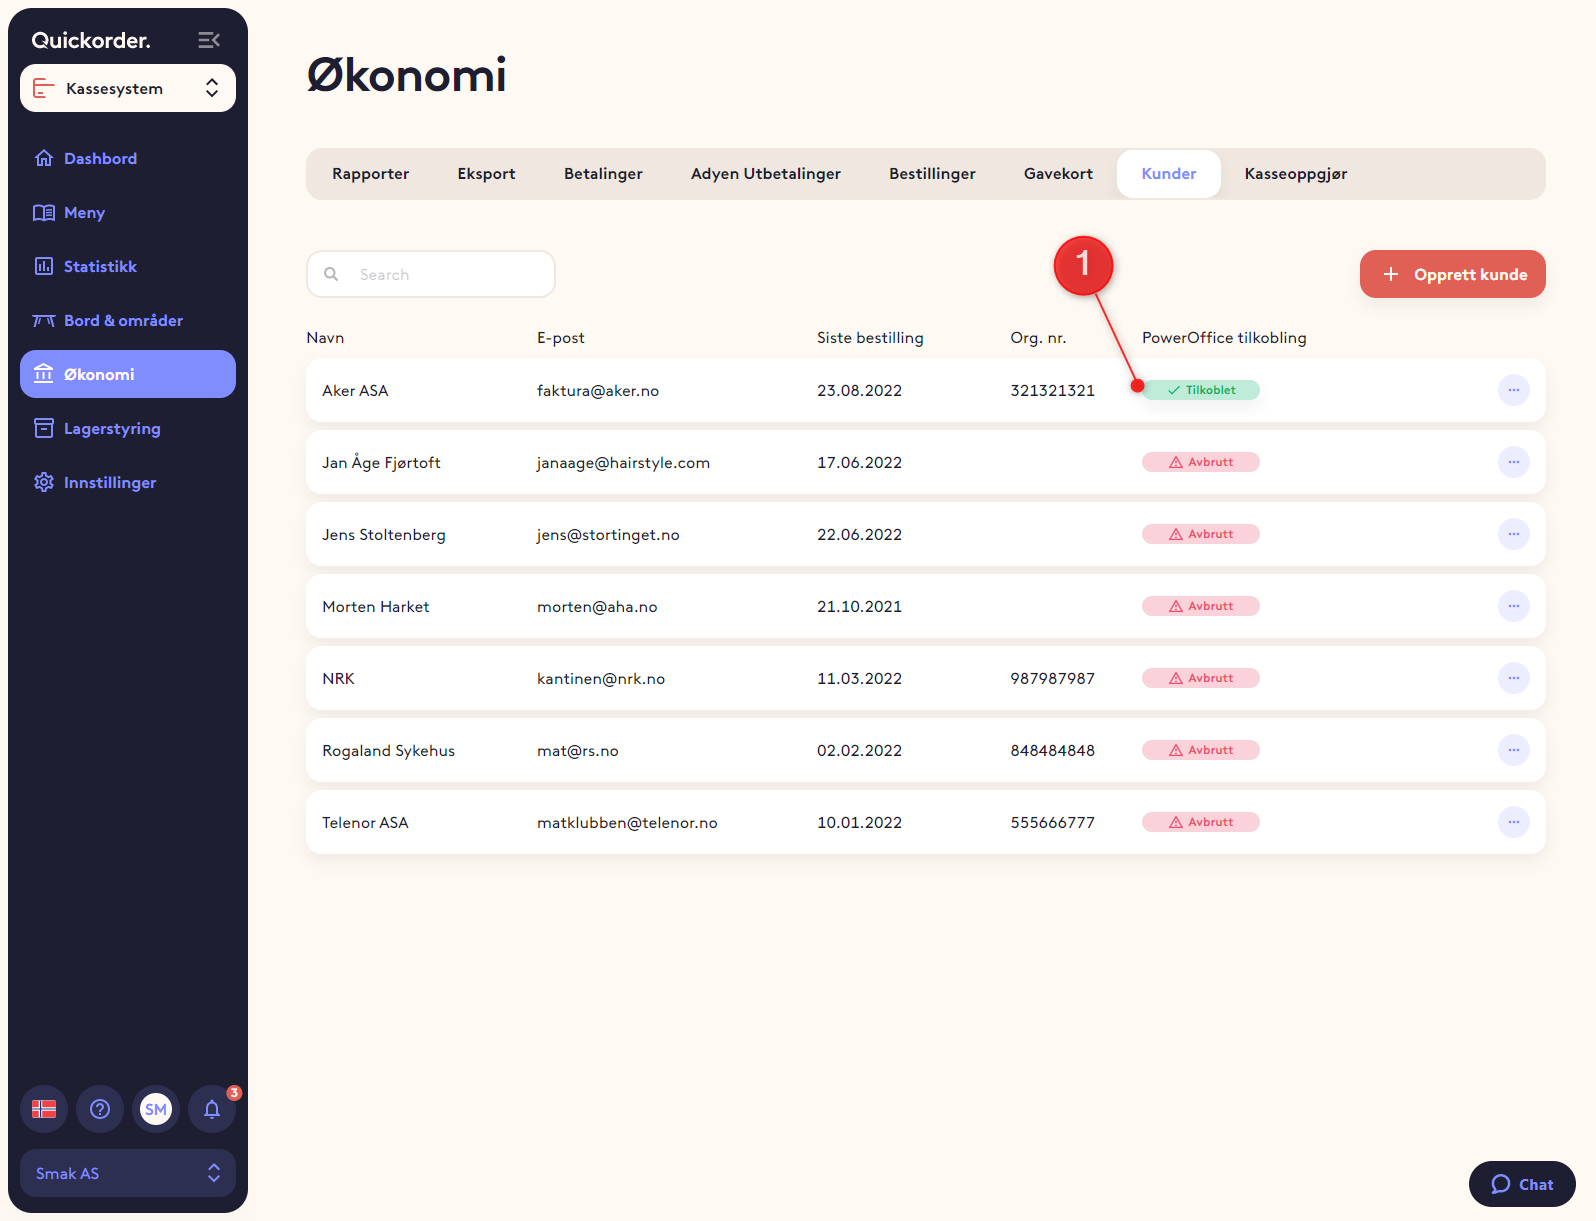
Verify that a customer is connected
- A green "connected" status should be displayed for this customer (1)
- Repeat for the other customers
That was it! All orders paid with 'credit' will now automatically be sent to PowerOffice where you can invoice.
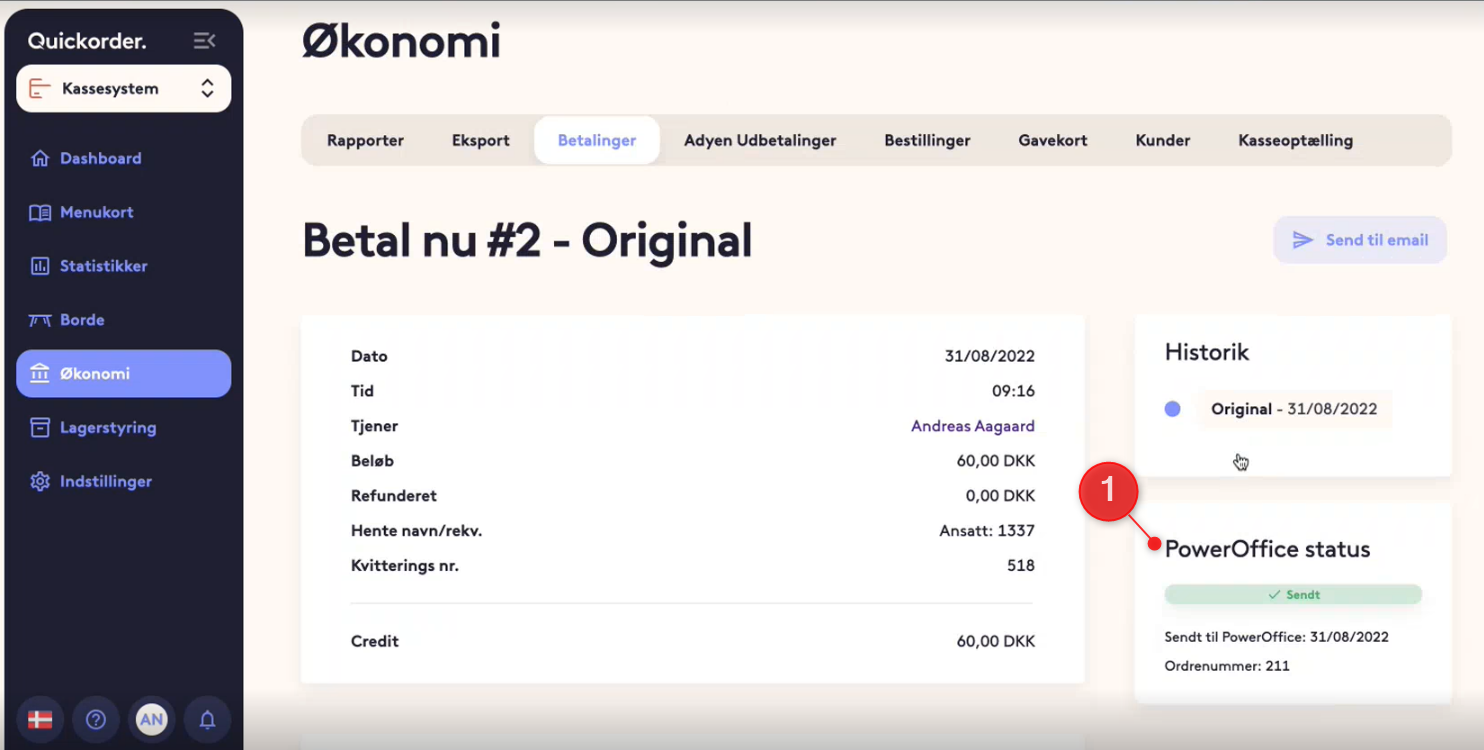
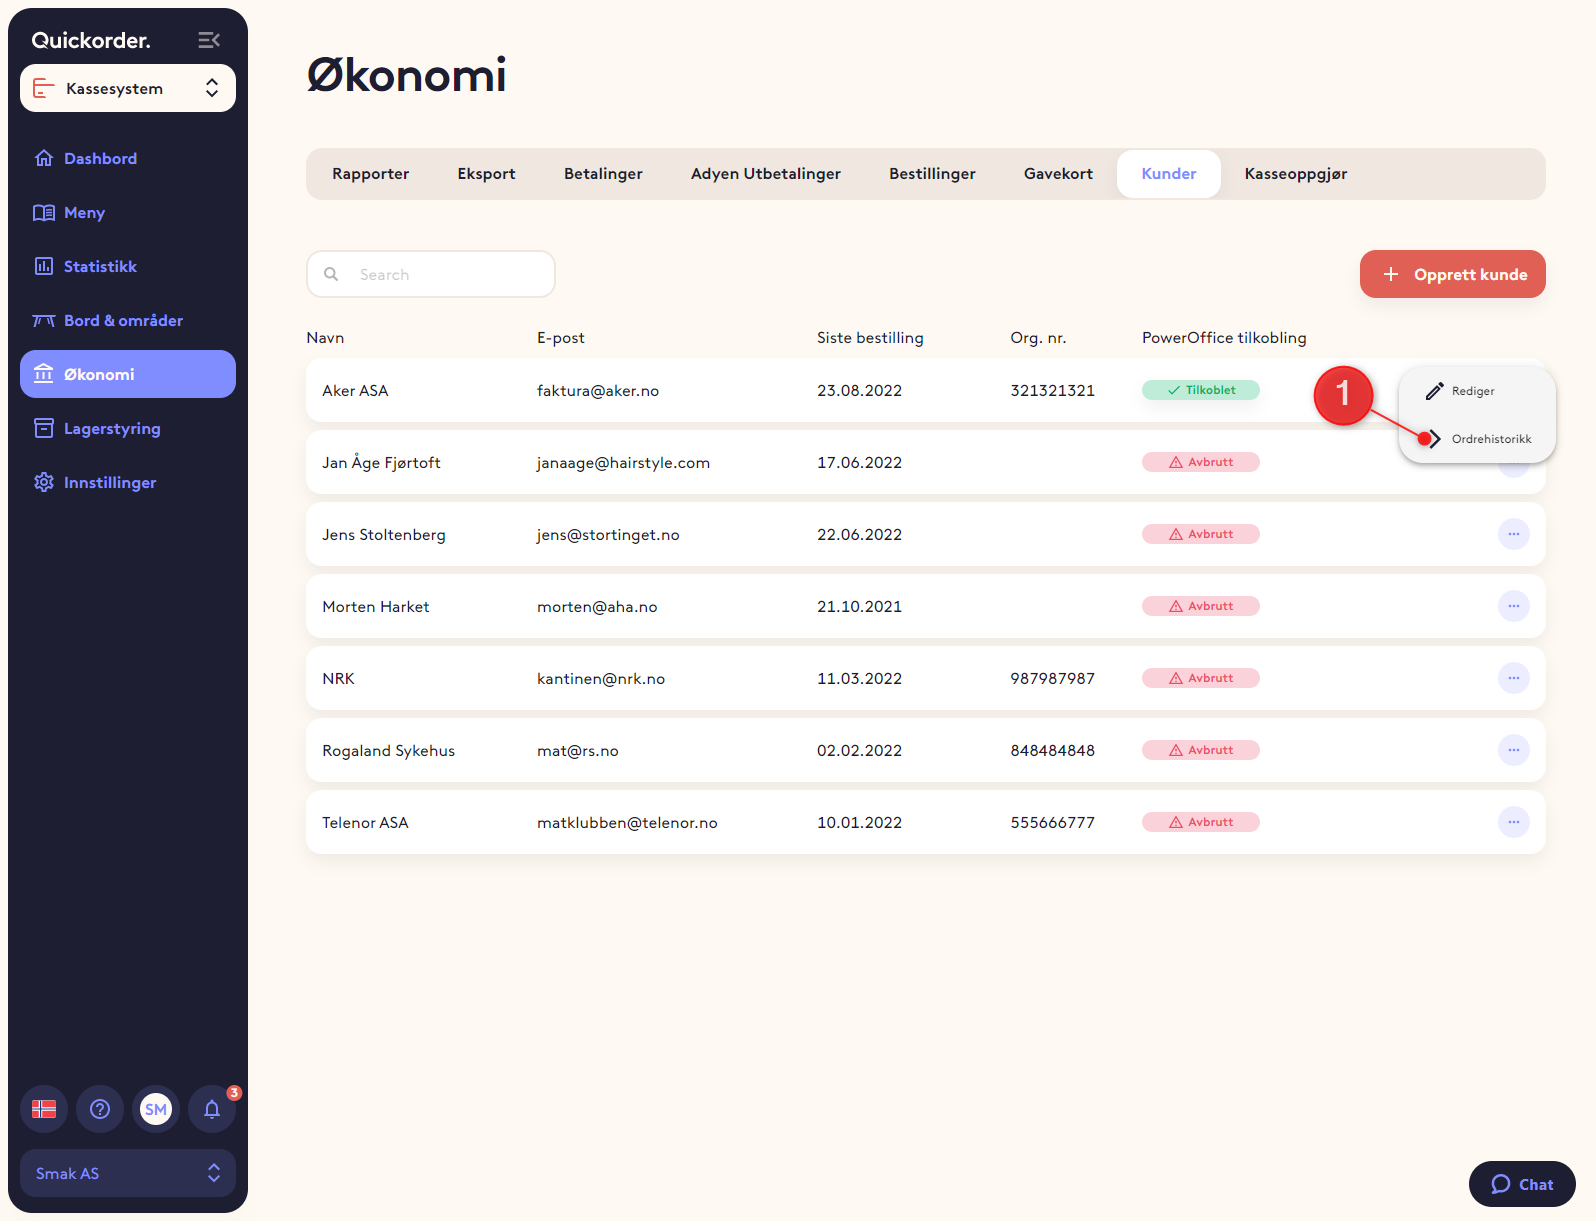
How to check if an order has been automatically invoiced
- Click on the blue button on a customer and select Order history (1)
- On the order overview, you can see the PowerOffice status (1) . If it is green, it has been sent. If it is red, it has not been sent.
- If an invoice has not been sent, you must do this manually. We will not try to send it again.
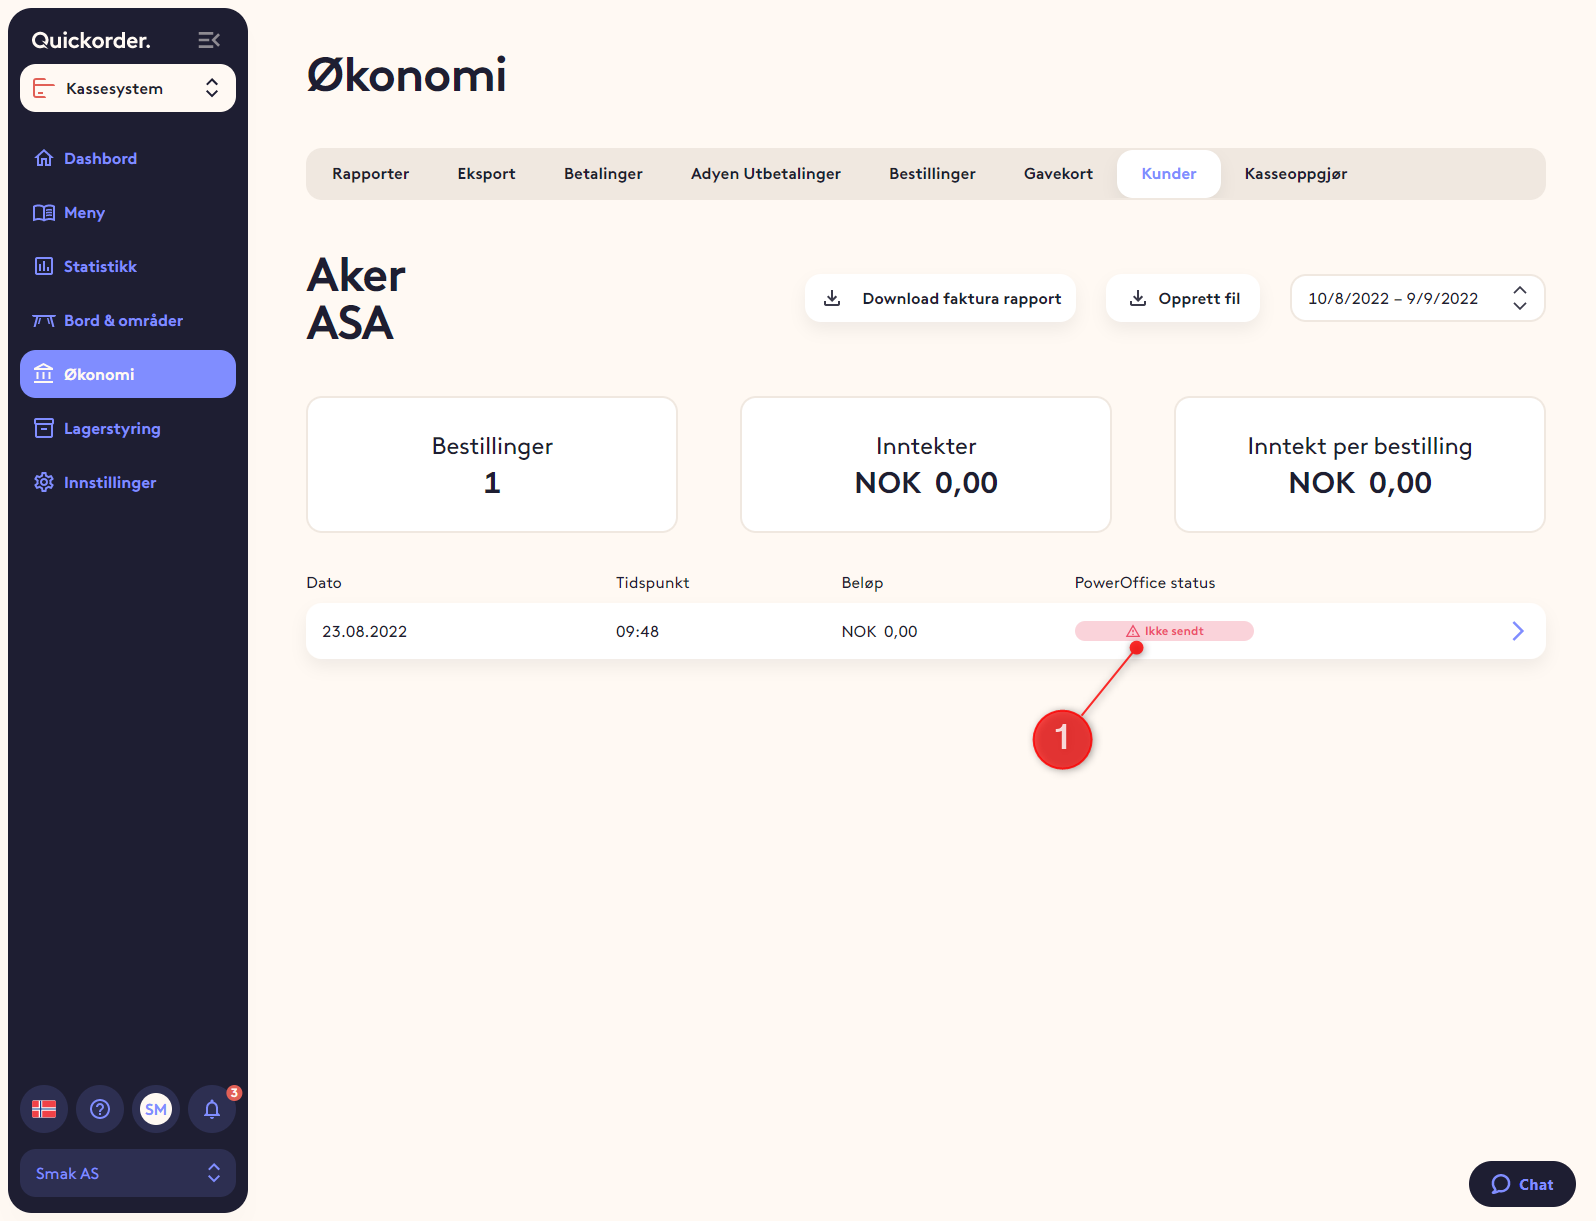
- If you click on the order line, you can see the order details page where you can see the PowerOffice status. If it has been sent, you can see when and the order number in PowerOffice.