
This article will help you add waiters on the POS backoffice
Table of contents:
1. Create Waiter
2. Waiter Rights
3. Activity Log
1. Create Waiter
First of all, your waiters must be created. It is an advantage that each server has its own user, as you subsequently have the opportunity to give your servers rights to different functions.
- Go to pos.quickorder.io
- Go to Settings > Waiters > Create waiter
- A window will appear where the name of the server and their personal PIN for the system must be entered
- Press Create waiter
TIP: Do you want to change the code for one of your employees? Then you can easily do this by pressing the small pencil next to the waiter in question after which you can change the code under Personal information.
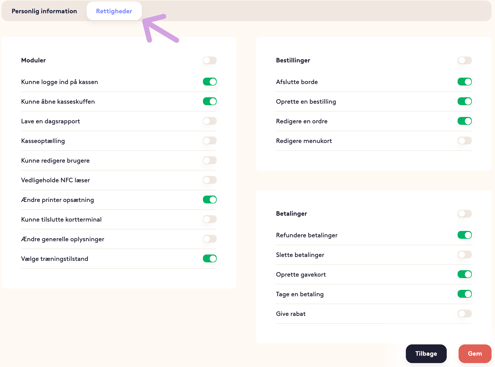
2. Waiter Rights
Rights can help reduce operational errors. Here, you can choose which rights in the system each waiter should have. For example, is it only your manager who should be able to give a discount? Then you can easily make sure that no one but that person can give discount.
NOTE: By default, your waiters will be created with no rights, so you must actively decide what rights a server should have when you create a new one.
- Tap the pencil next to the server for which you want to change permissions
- Under the menu permissions, you can turn the various rights on and off
- Press Save
REMEMBER: If you change the rights of one of your waiters, remember to go to Modules > Synchronize on your iPad, otherwise the changes will not be registered on the Quickorder POS app.
3. Activity Log
With the activity log you can see every time a PIN code is entered in the system.
This is regardless of whether the user has access or not.
1. Go to Settings > Activity log
2. Select which date you want to see
3. You can now see which waiters have entered their password in the respective modules

Congratulations! You now know how to create waiters and edit rights! 🤩